If you’re struggling with setting up your Washington State payroll in QuickBooks Online Payroll (QBOP) — you’re not alone. With all the moving parts from L&I, ESD, Paid Family Leave, and federal requirements, it’s easy to miss something that could cause issues down the road.
In this guide, I’ll walk you through how I set up payroll for my clients at Ready Accounting. I manage payroll for about 90 employees across 18 companies — and we do it with zero issues, all thanks to getting the setup right from the beginning.
Free 15 minute call to help you with your setup
Step 1: Start with Your Payroll Settings in QuickBooks
-
Legal Name & Address
Make sure you’re using your legal name and address, not your DBA. You can find this info on your EIN letter or tax return. -
EIN Number
Add your Employer Identification Number carefully. Mistakes here can lead to payments not being applied correctly. -
Tax Payment Frequency
I recommend selecting semi-weekly. It’s cleaner and ensures taxes are remitted right after each payroll, rather than weeks later.
Step 2: Set Up Washington Workers’ Comp (L&I)

Even if QuickBooks says it’s optional, it’s not. You’ll need to:
-
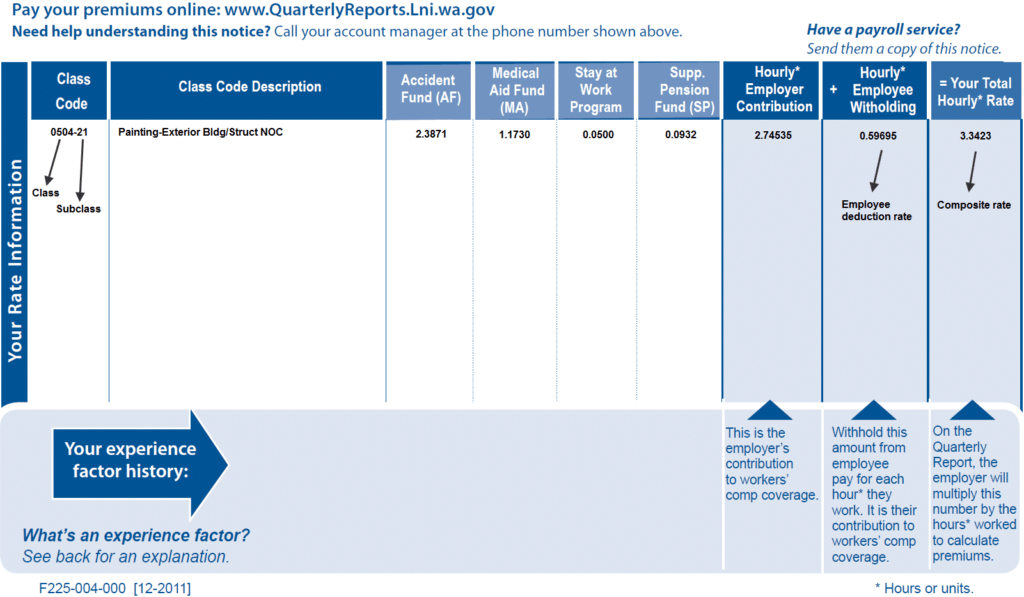
Add Your L&I Account ID
This is your L&I (Labor & Industries) number. You can find it on your L&I notice, through your SAW account or L&I website. -
Enter Your Class Codes & Rates
Each employee type (salesperson, office admin, warehouse worker, etc.) has a specific class code and composite rate. These are updated annually by L&I.-
Get your rates here: L&I Workers’ Comp Rates
-
Example:
-
Class Code: 5301-10
-
Rate: 0.2244/hour
-
Employee Deduction: 0.095/hour
-
-
💡 Pro Tip: Enter accurate class codes for every employee. A $3/hour mistake can cost you thousands over the year.
-
QuickBooks Limitation
QuickBooks doesn’t file your L&I reports — you’ll still need to file manually, but QuickBooks can generate a report to help.
Step 3: Add ESD (Unemployment Insurance)
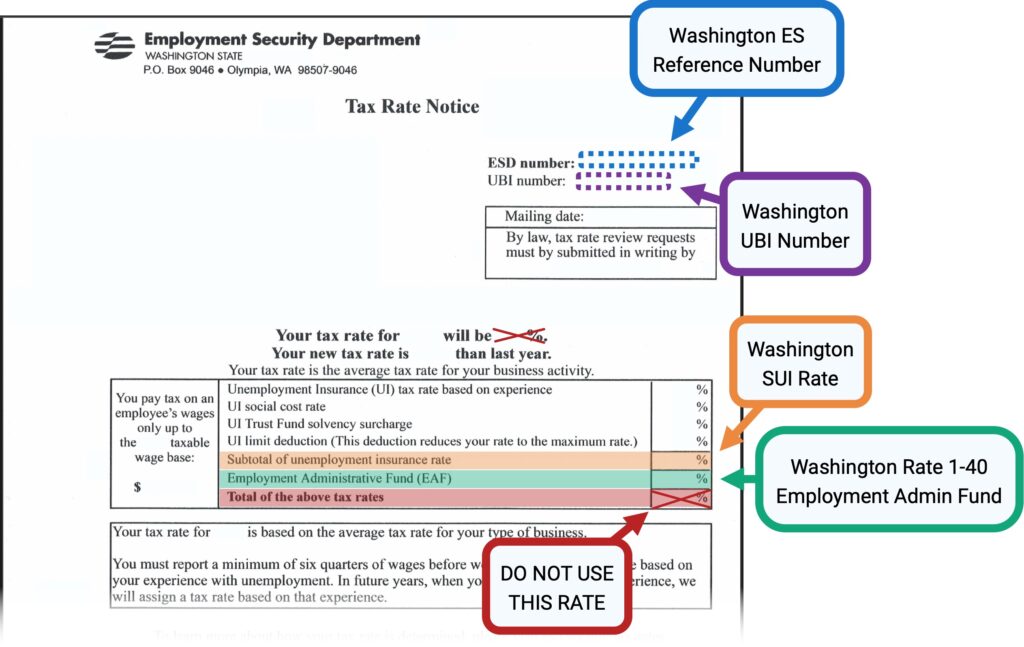
You’ll receive your ESD number when you first hire employees. Add it into QuickBooks and enter your specific rates:

-
Tax Rate (Example: 0.24%)
-
Administrative Fund Rate (Example: 0.03%)
These rates are updated annually, so be sure to review them at the start of each year.
Step 4: Set Up Paid Family Leave (PFML)
For employers with under 50 employees, you can choose to have employees cover their share. The current standard rate (subject to change annually) includes:
-
Employee Withholding: 0.58%
-
Optional Employer Contribution: Based on your business preference
Again, use the notices you receive in the mail or your SAW account to verify your current rate.
Step 5: Enter Your UBI Number
This step is crucial — QuickBooks will be filing reports to the state, and the UBI (Unified Business Identifier) must match state records to ensure proper filing and payment.
Final Checks
-
Always double-check your entries — QuickBooks sometimes doesn’t save settings properly.
-
If you use auto payroll, it’s best for salaried employees. I recommend manually running payroll for hourly workers due to variability.
-
Turn on automated tax forms and payments — especially helpful if you’re a new business and haven’t filed before.
- BONUS – Use this free resource to double-check your tax withholding before your payroll Payroll Tax Verification
Wrap-Up
Payroll setup might feel overwhelming, but with the right foundation, it becomes a smooth process. At Ready Accounting, we’ve helped dozens of businesses get their payroll dialed in with accurate calculations, timely filings, and zero state issues.
Free 15 minute call to help you with your set up
